Physical Address
304 North Cardinal St.
Dorchester Center, MA 02124
Physical Address
304 North Cardinal St.
Dorchester Center, MA 02124

[ad_1]
In “Unity AI Growth: A Finite-state Machine Tutorial,” we created a easy stealth sport—a modular FSM-based AI. Within the sport, an enemy agent patrols the gamespace. When it spots the participant, the enemy adjustments its state and follows the participant as an alternative of patrolling.
On this second leg of our Unity journey, we’ll construct a graphical person interface (GUI) to create the core parts of our finite-state machine (FSM) extra quickly, and with an improved developer expertise.
The FSM detailed within the earlier tutorial was constructed of architectural blocks as C# scripts. We added customized ScriptableObject actions and choices as courses. Our ScriptableObject strategy allowed us to have an simply maintainable and customizable FSM. On this tutorial, we change our FSM’s drag-and-drop ScriptableObjects with a graphical possibility.
In your sport, for those who’d like for the participant to win extra simply, change the participant detection script with this up to date script that narrows the enemy’s field of regard.
We’ll construct our graphical editor utilizing xNode, a framework for node-based conduct timber that can show our FSM’s circulate visually. Though Unity’s GraphView can accomplish the job, its API is each experimental and meagerly documented. xNode’s person interface delivers a superior developer expertise, facilitating the prototyping and speedy growth of our FSM.
Let’s add xNode to our undertaking as a Git dependency utilizing the Unity Bundle Supervisor:
https://github.com/siccity/xNode.git within the unlabeled textual content field and click on the Add button.Now we’re able to dive deep and perceive the important thing parts of xNode:
Node class |
Represents a node, a graph’s most elementary unit. On this xNode tutorial, we derive from the Node class new courses that declare nodes geared up with customized performance and roles. |
NodeGraph class |
Represents a group of nodes (Node class situations) and the perimeters that join them. On this xNode tutorial, we derive from NodeGraph a brand new class that manipulates and evaluates the nodes. |
NodePort class |
Represents a communication gate, a port of sort enter or sort output, positioned between Node situations in a NodeGraph. The NodePort class is exclusive to xNode. |
[Input] attribute |
The addition of the [Input] attribute to a port designates it as an enter, enabling the port to go values to the node it’s a part of. Consider the [Input] attribute as a perform parameter. |
[Output] attribute |
The addition of the [Output] attribute to a port designates it as an output, enabling the port to go values from the node it’s a part of. Consider the [Output] attribute because the return worth of a perform. |
In xNode, we work with graphs the place every State and Transition takes the type of a node. Enter and/or output connection(s) allow the node to narrate to all or any different nodes in our graph.
Let’s think about a node with three enter values: two arbitrary and one boolean. The node will output one of many two arbitrary-type enter values, relying on whether or not the boolean enter is true or false.
Department Node
To transform our present FSM to a graph, we modify the State and Transition courses to inherit the Node class as an alternative of the ScriptableObject class. We create a graph object of sort NodeGraph to include all of our State and Transition objects.
BaseStateMachine to Use As a Base SortWe’ll start constructing our graphical interface by including two new digital strategies to our present BaseStateMachine class:
Init |
Assigns the preliminary state to the CurrentState property |
Execute |
Executes the present state |
Declaring these strategies as digital permits us to override them, so we are able to outline the customized behaviors of courses inheriting the BaseStateMachine class for initialization and execution:
utilizing System;
utilizing System.Collections.Generic;
utilizing UnityEngine;

namespace Demo.FSM
{
    public class BaseStateMachine : MonoBehaviour
    {
        [SerializeField] personal BaseState _initialState;
        personal Dictionary<Sort, Element> _cachedComponents;
        personal void Awake()
        {
            Init();
            _cachedComponents = new Dictionary<Sort, Element>();
        }

        public BaseState CurrentState { get; set; }

        personal void Replace()
        {
            Execute();
        }

        public digital void Init()
        {
            CurrentState = _initialState;
        }

        public digital void Execute()
        {
            CurrentState.Execute(this);
        }

       // Permits us to execute consecutive calls of GetComponent in O(1) time
        public new T GetComponent<T>() the place T : Element
        {
            if(_cachedComponents.ContainsKey(typeof(T)))
                return _cachedComponents[typeof(T)] as T;

            var part = base.GetComponent<T>();
            if(part != null)
            {
                _cachedComponents.Add(typeof(T), part);
            }
            return part;
        }

    }
}
Subsequent, beneath our FSM folder, let’s create:
FSMGraph |
A folder |
BaseStateMachineGraph |
A C# class inside FSMGraph
|
In the intervening time, BaseStateMachineGraph will inherit simply the BaseStateMachine class:
utilizing UnityEngine;

namespace Demo.FSM.Graph
{
    public class BaseStateMachineGraph : BaseStateMachine
    {
    }
}
We are able to’t add performance to BaseStateMachineGraph till we create our base node sort; let’s do this subsequent.
NodeGraph and Making a Base Node SortBelow our newly created FSMGraph folder, we’ll create:
For now, FSMGraph will inherit simply the NodeGraph class (with no added performance):
utilizing UnityEngine;
utilizing XNode;

namespace Demo.FSM.Graph
{
    [CreateAssetMenu(menuName = "FSM/FSM Graph")]
    public class FSMGraph : NodeGraph
    {
    }
}
Earlier than we create courses for our nodes, let’s add:
FSMNodeBase |
A category for use as a base class by all of our nodes |
The FSMNodeBase class will include an enter named Entry of sort FSMNodeBase to allow us to attach nodes to at least one one other.
We will even add two helper features:
GetFirst |
Retrieves the primary node related to the requested output |
GetAllOnPort |
Retrieves all remaining nodes that hook up with the requested output |
utilizing System.Collections.Generic;
utilizing XNode;

namespace Demo.FSM.Graph
{
    public summary class FSMNodeBase : Node
    {
        [Input(backingValue = ShowBackingValue.Never)] public FSMNodeBase Entry;

        protected IEnumerable<T> GetAllOnPort<T>(string fieldName) the place T : FSMNodeBase
        {
            NodePort port = GetOutputPort(fieldName);
            for (var portIndex = 0; portIndex < port.ConnectionCount; portIndex++)
            {
                yield return port.GetConnection(portIndex).node as T;
            }
        }

        protected T GetFirst<T>(string fieldName) the place T : FSMNodeBase
        {
            NodePort port = GetOutputPort(fieldName);
            if (port.ConnectionCount > 0)
                return port.GetConnection(0).node as T;
            return null;
        }
    }
}
In the end, we’ll have two forms of state nodes; let’s add a category to help these:
BaseStateNode |
A base class to help each StateNode and RemainInStateNode
|
namespace Demo.FSM.Graph
{
    public summary class BaseStateNode : FSMNodeBase
    {
    }
}
Subsequent, modify the BaseStateMachineGraph class:
utilizing UnityEngine;
namespace Demo.FSM.Graph
{
    public class BaseStateMachineGraph : BaseStateMachine
    {
        public new BaseStateNode CurrentState { get; set; }
    }
}
Right here, we’ve hidden the CurrentState property inherited from the bottom class and altered its sort from BaseState to BaseStateNode.
Now, to kind our FSM’s primary constructing blocks, let’s add three new courses to our FSMGraph folder:
StateNode |
Represents the state of an agent. On execute, StateNode iterates over the TransitionNodes related to the output port of the StateNode (retrieved by a helper technique). StateNode queries every one whether or not to transition the node to a distinct state or depart the node’s state as is. |
RemainInStateNode |
Signifies a node ought to stay within the present state. |
TransitionNode |
Makes the choice to transition to a distinct state or keep in the identical state. |
Within the earlier Unity FSM tutorial, the State class iterates over the transitions listing. Right here in xNode, StateNode serves as State’s equal to iterate over the nodes retrieved through our GetAllOnPort helper technique.
Now add an [Output] attribute to the outgoing connections (the transition nodes) to point that they need to be a part of the GUI. By xNode’s design, the attribute’s worth originates within the supply node: the node containing the sphere marked with the [Output] attribute. As we’re utilizing [Output] and [Input] attributes to explain relationships and connections that shall be set by the xNode GUI, we are able to’t deal with these values as we usually would. Contemplate how we iterate via Actions versus Transitions:
utilizing System.Collections.Generic;
namespace Demo.FSM.Graph
{
    [CreateNodeMenu("State")]
    public sealed class StateNode : BaseStateNode
    {
        public Record<FSMAction> Actions;
        [Output] public Record<TransitionNode> Transitions;
        public void Execute(BaseStateMachineGraph baseStateMachine)
        {
            foreach (var motion in Actions)
                motion.Execute(baseStateMachine);
            foreach (var transition in GetAllOnPort<TransitionNode>(nameof(Transitions)))
                transition.Execute(baseStateMachine);
        }
    }
}
On this case, the Transitions output can have a number of nodes hooked up to it; we’ve got to name the GetAllOnPort helper technique to acquire an inventory of the [Output] connections.
RemainInStateNode is, by far, our easiest class. Executing no logic, RemainInStateNode merely signifies to our agent—in our sport’s case, the enemy—to stay in its present state:
namespace Demo.FSM.Graph
{
    [CreateNodeMenu("Remain In State")]
    public sealed class RemainInStateNode : BaseStateNode
    {
    }
}
At this level, the TransitionNode class remains to be incomplete and won’t compile. The related errors will clear as soon as we replace the category.
To construct TransitionNode, we have to get round xNode’s requirement that the worth of the output originates within the supply node—as we did once we constructed StateNode. A significant distinction between StateNode and TransitionNode is that TransitionsNode’s output could connect to just one node. In our case, GetFirst will fetch the one node hooked up to every of our ports (one state node to transition to within the true case and one other to transition to within the false case):
namespace Demo.FSM.Graph
{
    [CreateNodeMenu("Transition")]
    public sealed class TransitionNode : FSMNodeBase
    {
        public Determination Determination;
        [Output] public BaseStateNode TrueState;
        [Output] public BaseStateNode FalseState;
        public void Execute(BaseStateMachineGraph stateMachine)
        {
            var trueState = GetFirst<BaseStateNode>(nameof(TrueState));
            var falseState = GetFirst<BaseStateNode>(nameof(FalseState));
            var resolution = Determination.Resolve(stateMachine);
            if (resolution && !(trueState is RemainInStateNode))
            {
                stateMachine.CurrentState = trueState;
            }
            else if(!resolution && !(falseState is RemainInStateNode))
                stateMachine.CurrentState = falseState;
        }
    }
}
Let’s take a look on the graphical outcomes from our code.
Now, with all of the FSM courses sorted out, we are able to proceed to create our FSM Graph for the sport’s enemy agent. Within the Unity undertaking window, right-click the EnemyAI folder and select: Create > FSM > FSM Graph. To make our graph simpler to establish, let’s rename it EnemyGraph.
Within the xNode Graph editor window, right-click to disclose a drop-down menu itemizing State, Transition, and RemainInState. If the window isn’t seen, double-click the EnemyGraph file to launch the xNode Graph editor window.
To create the Chase and Patrol states:
Proper-click and select State to create a brand new node.
Title the node Chase.
Return to the drop-down menu, select State once more to create a second node.
Title the node Patrol.
Drag and drop the prevailing Chase and Patrol actions to their newly created corresponding states.
To create the transition:
Proper-click and select Transition to create a brand new node.
Assign the LineOfSightDecision object to the transition’s Determination discipline.
To create the RemainInState node:
To attach the graph:
Join the Patrol node’s Transitions output to the Transition node’s Entry enter.
Join the Transition node’s True State output to the Chase node’s Entry enter.
Join the Transition node’s False State output to the Stay In State node’s Entry enter.
The graph ought to appear like this:
Nothing within the graph signifies which node—the Patrol or Chase state—is our preliminary node. The BaseStateMachineGraph class detects 4 nodes however, with no indicators current, can’t select the preliminary state.
To resolve this subject, let’s create:
FSMInitialNode |
A category whose single output of sort StateNode is called InitialNode
|
Our output InitialNode denotes the preliminary state. Subsequent, in FSMInitialNode, create:
NextNode |
A property to allow us to fetch the node related to the InitialNode output |
utilizing XNode;
namespace Demo.FSM.Graph
{
    [CreateNodeMenu("Initial Node"), NodeTint("#00ff52")]
    public class FSMInitialNode : Node
    {
        [Output] public StateNode InitialNode;
        public StateNode NextNode
        {
            get
             port.ConnectionCount == 0)
                    return null;
                return port.GetConnection(0).node as StateNode;

        }
    }
}
Now that we created theFSMInitialNode class, we are able to join it to the Entry enter of the preliminary state and return the preliminary state through the NextNode property.
Let’s return to our graph and add the preliminary node. Within the xNode editor window:
Patrol node’s Entry enter.The graph ought to now appear like this:
To make our lives simpler, we’ll add to FSMGraph:
The primary time we attempt to retrieve the InitialState property’s worth, the getter of the property will traverse all nodes in our graph because it tries to search out FSMInitialNode. As soon as FSMInitialNode is positioned, we use the NextNode property to search out our preliminary state node:
utilizing System.Linq;
utilizing UnityEngine;
utilizing XNode;
namespace Demo.FSM.Graph
{
    [CreateAssetMenu(menuName = "FSM/FSM Graph")]
    public sealed class FSMGraph : NodeGraph
    {
        personal StateNode _initialState;
        public StateNode InitialState
        {
            get
            {
                if (_initialState == null)
                    _initialState = FindInitialStateNode();
                return _initialState;
            }
        }
        personal StateNode FindInitialStateNode()
        {
            var initialNode = nodes.FirstOrDefault(x => x is FSMInitialNode);
            if (initialNode != null)
            {
                return (initialNode as FSMInitialNode).NextNode;
            }
            return null;
        }
    }
}
Now, in our BaseStateMachineGraph, let’s reference FSMGraph and override our BaseStateMachine’s Init and Execute strategies. Overriding Init units CurrentState because the graph’s preliminary state, and overriding Execute calls Execute on CurrentState:
utilizing UnityEngine;
namespace Demo.FSM.Graph
{
    public class BaseStateMachineGraph : BaseStateMachine
    {
        [SerializeField] personal FSMGraph _graph;
        public new BaseStateNode CurrentState { get; set; }
        public override void Init()
        {
            CurrentState = _graph.InitialState;
        }
        public override void Execute()
        {
            ((StateNode)CurrentState).Execute(this);
        }
    }
}
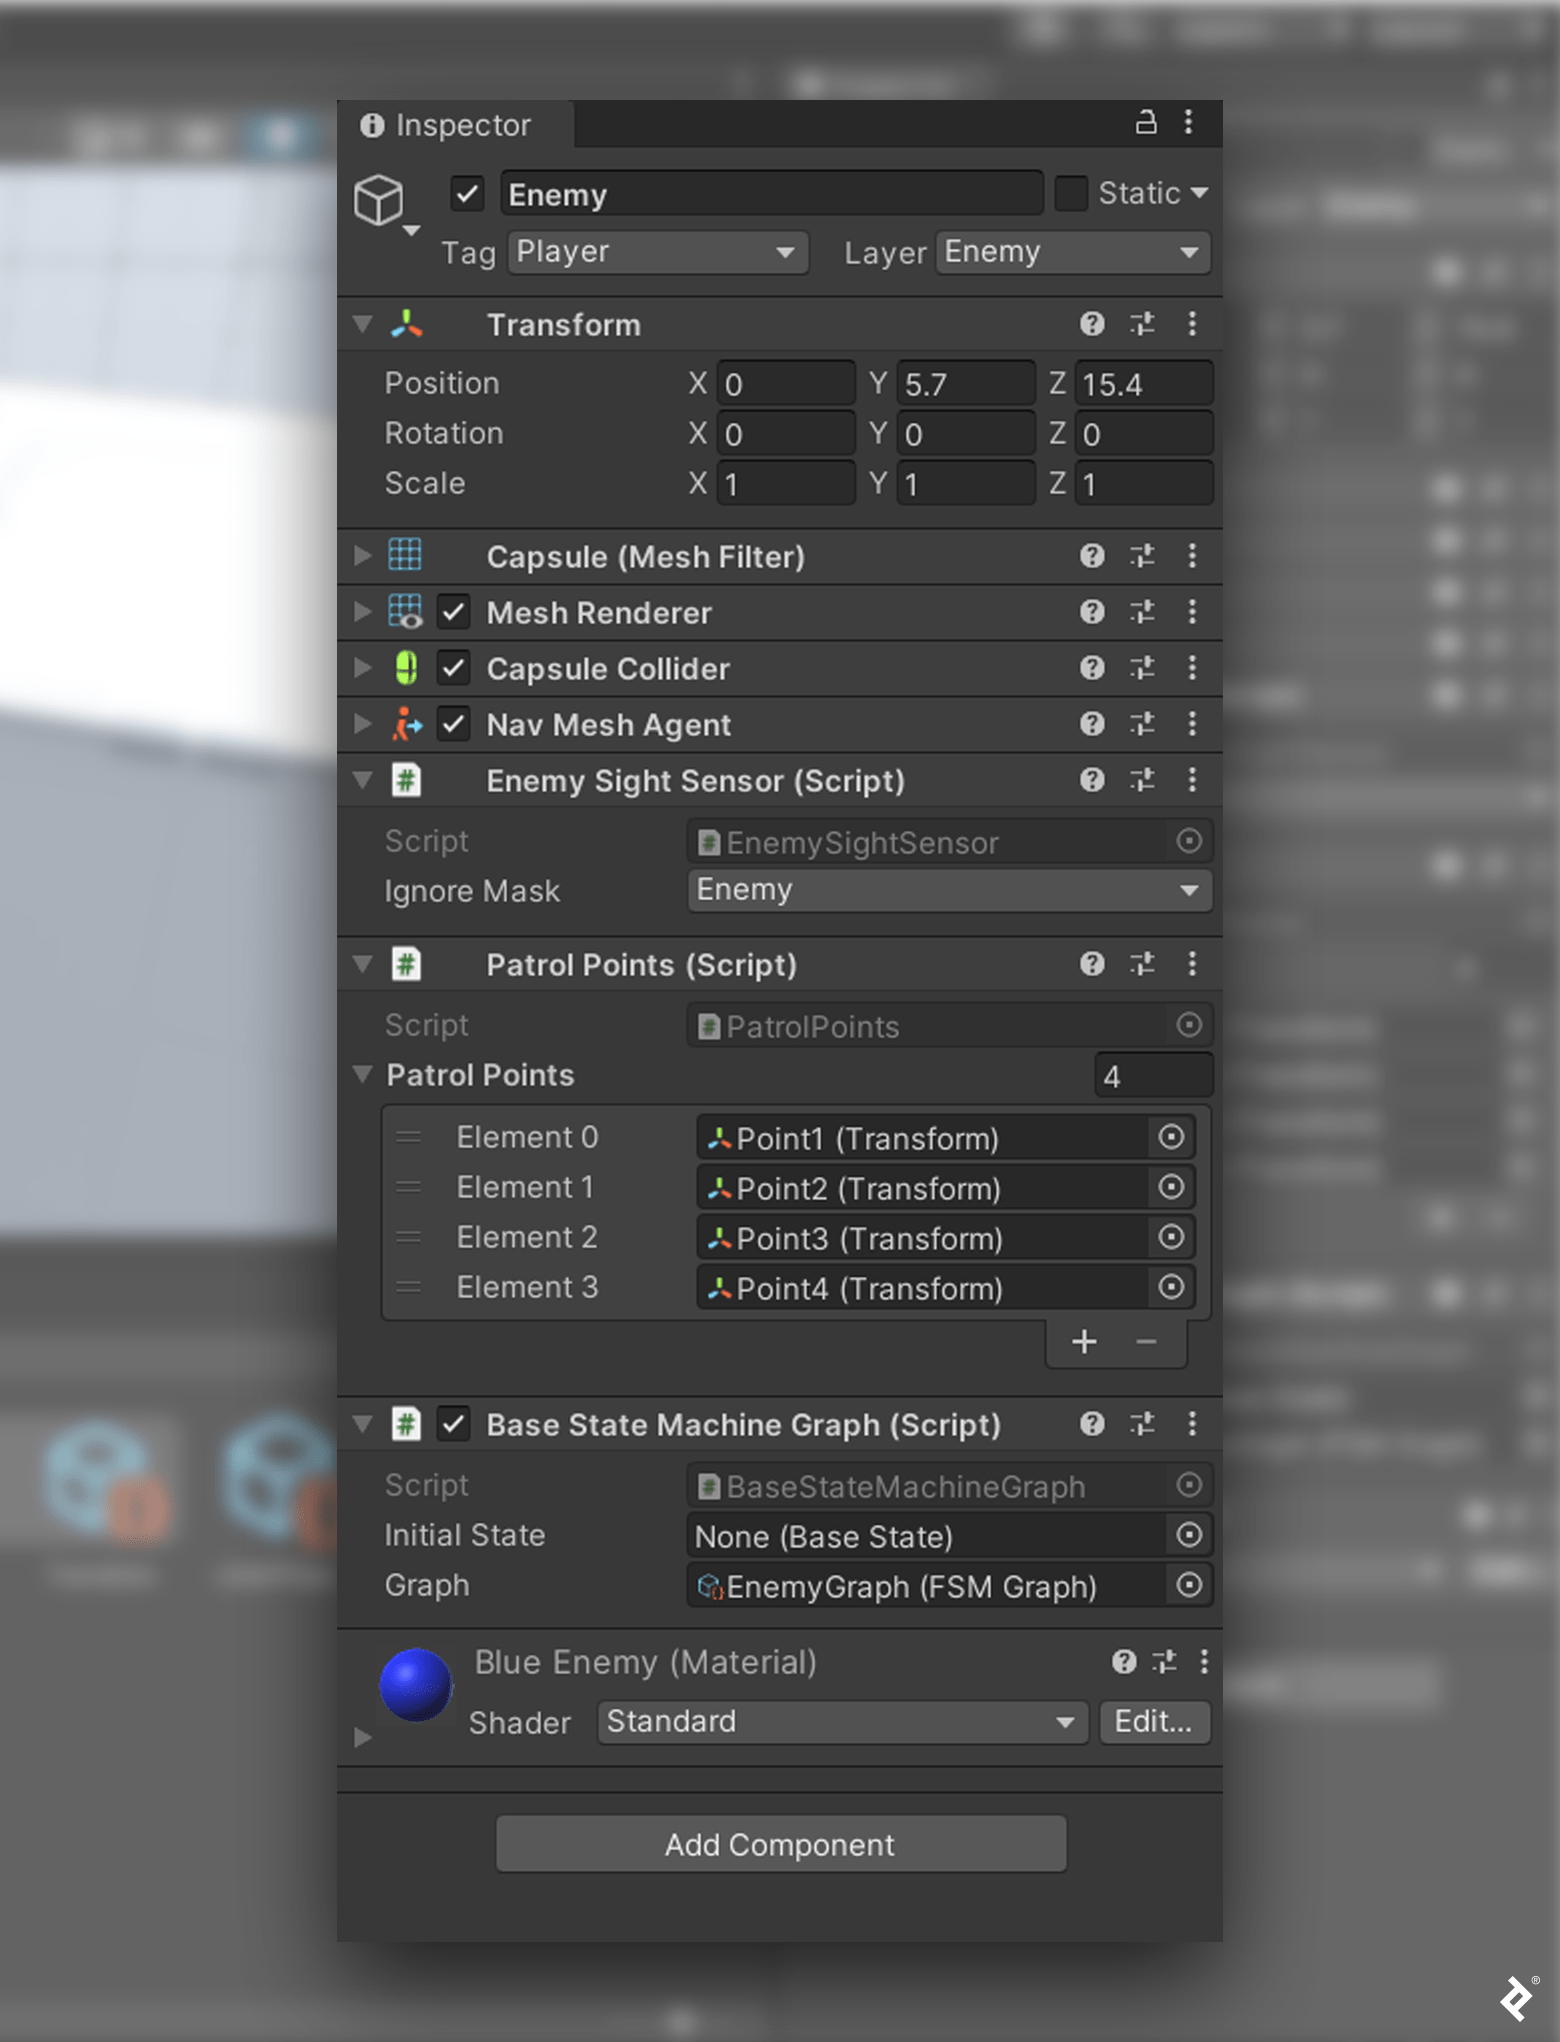
Now, let’s apply our graph to our Enemy object, and see it in motion.
In preparation for testing, within the Unity Editor’s Venture window, we have to:
Open the SampleScene asset.
Find our Enemy sport object within the Unity hierarchy window.
Change the BaseStateMachine part with the BaseStateMachineGraph part:
Click on Add Element and choose the proper BaseStateMachineGraph script.
Assign our FSM graph, EnemyGraph, to the Graph discipline of the BaseStateMachineGraph part.
Delete the BaseStateMachine part (as it’s not wanted) by right-clicking and choosing Take away Element.
Now the Enemy sport object ought to appear like this:
Enemy Recreation Object
That’s it! Now we’ve got a modular FSM with a graphic editor. Once we click on the Play button, we see our graphically created enemy AI works precisely as our beforehand created ScriptableObject enemy.
Some great benefits of utilizing a graphical editor are self-evident, however I’ll depart you with a phrase of warning: As you develop extra subtle AI to your sport, the variety of states and transitions grows, and the FSM turns into complicated and tough to learn. The graphical editor grows to resemble an online of strains that originate in a number of states and terminate at a number of transitions—and vice versa, making our FSM tough to debug.
As we did within the earlier tutorial, we invite you to make the code your personal, and depart the door open so that you can optimize your stealth sport and deal with these issues. Think about how useful it might be to color-code your state nodes to point whether or not a node is energetic or inactive, or resize the RemainInState and Preliminary nodes to restrict their display actual property.
Such enhancements should not merely beauty. Coloration and measurement references would assist us establish the place and when to debug. A graph that’s straightforward on the attention can be easier to evaluate, analyze, and comprehend. Any subsequent steps are as much as you—with the muse of our graphical editor in place, there’s no restrict to the developer expertise enhancements you may make.
The editorial crew of the Toptal Engineering Weblog extends its gratitude to Goran Lalić and Maddie Douglas for reviewing the code samples and different technical content material offered on this article.
[ad_2]