Physical Address
304 North Cardinal St.
Dorchester Center, MA 02124
Physical Address
304 North Cardinal St.
Dorchester Center, MA 02124

[ad_1]
 Raspberry Pi’s first board primarily based on a single microcontroller chip, the Raspberry Pi Pico (Fig. 1), is designed for bodily computing—related in idea to an Arduino—ratherthan carry out the function of a general-purpose pc (just like the others within the vary). The Raspberry Pi Pico has 264kB RAM and 2MB flash reminiscence, and it’s programmable in MicroPython, CircuitPython, and C (https://en.wikipedia.org/wiki/Raspberry_Pi).
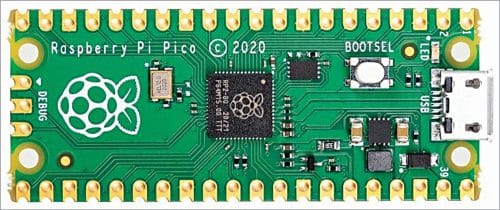
The aim of this text is to introduce Raspberry Pi Pico (RPi Pico), which operates at 133MHz with twin cores. As a result of it will probably run MicroPython, even a novice can begin coding in a brief period of time. So, here’s a undertaking that may be executed simply.
Nevertheless, earlier than leaping into the experiment/undertaking, it will be a good suggestion to get acquainted with the RPi Pico microcontroller board. The next hyperlinks would enable you to to make sure an ideal begin:
Firmware for Raspberry Pi Pico could be gathered from this hyperlink
You possibly can obtain Thonny – Python IDE for newbies
This hyperlink helps you learn to program Raspberry Pi Pico utilizing MicroPython
The Raspberry Pi Pico primarily based noise generator undertaking described right here is actually a easy tone generator setup realised with the assistance of some exterior components. Its schematic diagram is proven in Fig. 2.
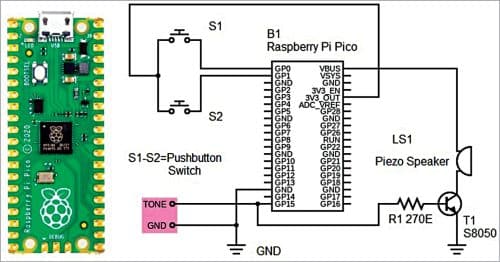
As you possibly can see, the setup delivers an analogue output by means of GP15 of Raspberry Pi Pico to drive a piezo speaker. The pushbutton switches S1 and S2 are wired to GP0 and GP1 to regulate the tone era.
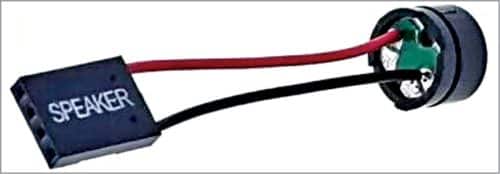
The factor used right here for sound will not be a typical piezo buzzer; it’s a piezo speaker that can also be known as ‘motherboard speaker.’ This piezo speaker (Fig. 3) is often employed to acquire beep sound from pc motherboards, alarm methods, and different digital gadgets. The tone output from the Raspberry Pi Pico board (TONE and GND) is sort of low, so transistor S8050 is used to drive the 16-ohm sounder factor (LS1).
Your entire {hardware} setup could be operated from a steady 5V DC/USB energy supply. The only approach is to plug the exterior USB energy supply into the onboard micro-USB connector, which is able to energy VSYS and due to this fact the system from the USB 5V (VBUS).
As a substitute of looping quick to learn the worth of a pushbutton swap, the microcontroller may also be notified of a change by means of an interrupt request (IRQ). An IRQ lets the processor be interrupted from its essential loop to do a factor earlier than returning to the duty it was doing earlier.
The simplistic code ready for the above {hardware} setup to regulate the IRQ utilizing two buttons (S1 and S2) after which generate an analogue output to drive the sounder factor is given alongside (supply of inspiration). The supply code (piconoisemaker.py) is listed beneath:
import machine
#Setup Button Enter x2 (0 & 1)
ButtonA = machine.Pin(0, machine.Pin.IN,
machine.Pin.PULL_DOWN)
ButtonB = machine.Pin(1,machine.Pin.IN,
machine.Pin.PULL_DOWN)
#Setup PWM Buzzer Output x1 (15)
Buzzer = machine.PWM(machine.Pin(15))
Buzzer.duty_u16(32767) #Make it 50% obligation
cycle (32767/65535)
Frequency = 1000 #Set a beginning
frequency of 1kHz
def ButtonIRQHandler(pin):
world Frequency
if pin == ButtonA: #Increase the frequency
if Frequency < 2000:
Frequency += 50
elif pin == ButtonB: #Decrease the
frequency
if Frequency > 100:
Frequency -= 50
#Setup the IRQ and hook it to the handler
ButtonA.irq(set off = machine.Pin.IRQ_
RISING,
handler = ButtonIRQHandler)
ButtonB.irq(set off = machine.Pin.IRQ_
RISING,
handler = ButtonIRQHandler)
whereas True:
Buzzer.freq(Frequency)
Whereas on the topic, a PY file is a program file (or script) written in Python, which is an interpreted object-oriented programming language. It may be created and edited with a textual content editor however requires a Python interpreter to run. Merely go for Thonny!
Thonny comes with Python 3.7 inbuilt, so you do not want to put in Python individually. Simply set up Thonny in your pc and you’re able to go!
After you have put in Thonny IDE, join your Raspberry Pi Pico board along with your pc by means of an acceptable USB knowledge cable. That you must press and maintain the BOOTSEL button on the Raspberry Pi Pico board (B1) whereas connecting it to your pc utilizing a USB-A to micro-USB knowledge cable.
After efficiently connecting to PC, you possibly can see your Raspberry Pi Pico as USB mass storage gadget.
Now you possibly can open Thonny IDE and there can be a popup that exhibits some info concerning Raspberry Pi Pico. Simply proceed to put in the MicroPython firmware. Your Raspberry Pi Pico board is now up to date with MicroPython firmware and is able to execute Python codes.
(Truly, there may be additionally a drag and drop approach to do that. Test this hyperlink)
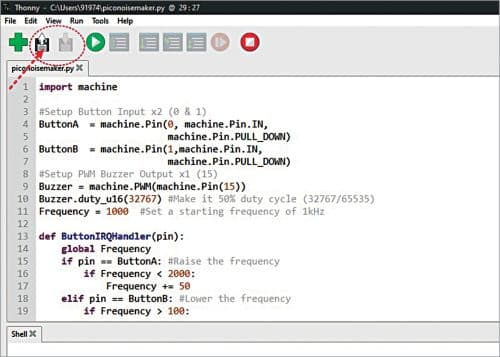
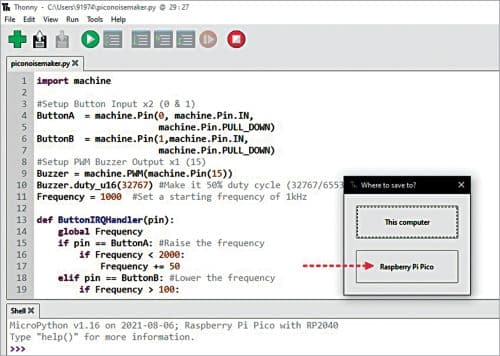
Copy-paste the above Python code in Thonny editor window (Fig. 4) and save the code earlier than you run it. See there are two floppy disc buttons—open and save.
Select Raspberry Pi Pico within the “the place to save lots of to” popup window, as proven in Fig. 5, assign a reputation to your Python file with an extension ‘py’ and click on OK.
As soon as the code is saved, the inexperienced Play button on prime can be utilized to execute the code in Raspberry Pi Pico. To cease the code’s execution, use the purple Cease button.
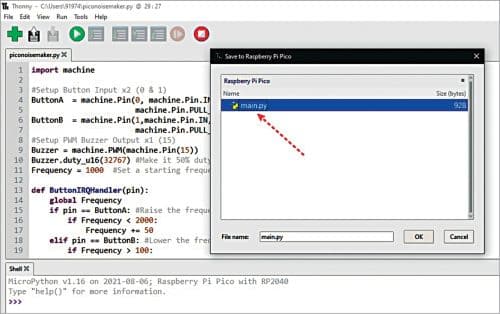
Keep in mind, the noise era code needs to be run robotically to energy the standalone Raspberry Pi Pico setup. So, when saving the code file on the Raspberry Pi Pico board, title it essential.py (Fig. 6).
Superior? Properly, simply do it your individual approach!
Testing of this undertaking is easy if you already know what you’re going to do! After profitable building, simply run the prototype with a USB energy financial institution or an identical USB energy supply. If all goes effectively, the tone sign could be heard. The pushbuttons S1 and S2 can be utilized to extend or lower the tone frequency.
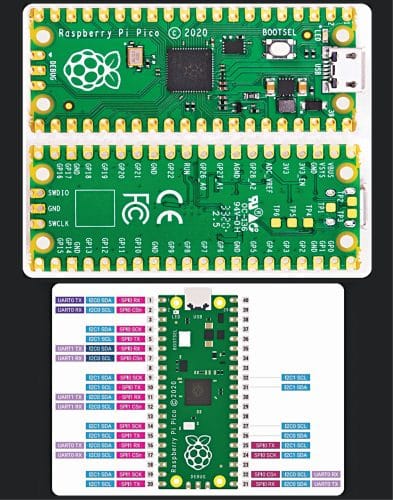
The creator has been taking part in with Raspberry Pi Pico quite a bit currently. He has written on some on-line channels about Raspberry Pi Pico, which is an superior minuscule microcontroller board able to working code to regulate bodily {hardware}. Pin particulars of the Pico board are proven in Fig. 7.
The Raspberry Pi Pico used for this undertaking already had headers soldered on, and the creator had beforehand put MicroPython on it. He’s utilizing Thonny 3.3.3 (Fig. 8) on his Home windows 10 (64-bit) pc.

The creator’s prototype wired on the breadboard is proven in Fig. 9.

This tutorial is introduced by the creator so that you can try to be taught. You could enhance the code for higher software. You could even take this additional into the realm {of professional} digital tone mills. It’s hoped you’ll find extra attention-grabbing methods to play with audio on the Raspberry Pi Pico!
T.Ok. Hareendran is an electronics designer, {hardware} beta tester, technical creator, and product reviewer
[ad_2]